Deploying the Frontend
- The frontend has been optimized to use PNPM as the package manager.
- If you wish to use NPM or Yarn, you will need to update the
Dockerfileto use the appropriate package manager.
The frontend is deployed as a separate service in the ui container since it runs as a standalone service and not using static files.
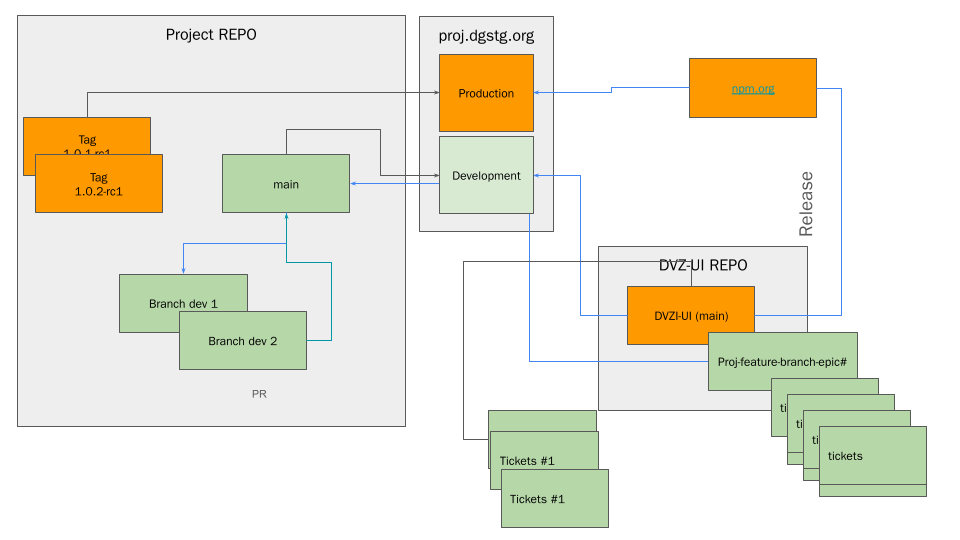
Deployment Workflows Overview
The front project supports two deployment workflows depending on your needs:
- Feature Branch with RC Tags: Create a feature branch and tag it with a Release Candidate (RC) version for testing
- Production Deployment: Merge feature branches to
mainwhen ready for production deployment
The following diagram illustrates the complete deployment workflow:
Workflow 1: Feature Branch with RC Tags
This workflow is used when you want to test features before merging them to main. It involves creating a feature branch and tagging it with an RC (Release Candidate) version.
Prerequisites
- Access to create branches in the repository
- Permission to create Git tags
- Jenkins CI/CD pipeline access
Steps
- Create a feature branch from
main:
git checkout main
git pull origin main
git checkout -b feature/feature-name
- Develop and commit your changes:
git add .
git commit -m "feat: add new feature"
git push origin feature/feature-name
- Create an RC tag on the feature branch for testing:
# Tag format: <version>-rc<number>
# Example: 1.0.1-rc1, 1.0.1-rc2, etc.
git tag -a 1.0.1-rc1 -m "Release Candidate 1 for version 1.0.1"
git push origin 1.0.1-rc1
-
Trigger Jenkins build for the feature branch:
- The Jenkins pipeline will automatically detect the branch name
- The
TAGenvironment variable will be set to the sanitized branch name (e.g.,feature_feature_name) - The build will use
test.Dockerfilefor testing deployments
-
Verify deployment:
- Check the Jenkins build logs to ensure the build completed successfully
- Verify the deployment in the testing environment
- Test your features thoroughly
-
Iterate if needed:
- Make additional changes and create new RC tags (e.g.,
1.0.1-rc2,1.0.1-rc3) - Continue testing until the feature is ready for production
- Make additional changes and create new RC tags (e.g.,
RC Tag Naming Convention
- Format:
<major>.<minor>.<patch>-rc<number> - Examples:
1.0.1-rc1,1.0.1-rc2,1.2.0-rc1 - Increment the RC number for subsequent testing iterations
- RC tags can be created on any feature branch for testing purposes
Workflow 2: Production Deployment via Main Branch
This workflow is used when features are ready for production. It involves creating a branch against main, merging via Pull Request, and deploying to production.
Prerequisites
- Feature is tested and ready for production
- Code review approval
- Access to merge Pull Requests
Steps
- Create a feature branch from
main:
git checkout main
git pull origin main
git checkout -b feature/feature-name
- Develop and commit your changes:
git add .
git commit -m "feat: add production-ready feature"
git push origin feature/feature-name
-
Create a Pull Request against
main:- Open a Pull Request from your feature branch to
main - Request code review
- Address any review feedback
- Open a Pull Request from your feature branch to
-
Merge to main:
- Once approved, merge the Pull Request to
main - The Jenkins pipeline will automatically trigger a build for
main
- Once approved, merge the Pull Request to
-
Deploy to Development:
- The
mainbranch automatically deploys to the Development environment - Verify the deployment works correctly in Development
- The
-
Promote to Production:
- After successful testing in Development, promote to Production
- The Production environment pulls from the Development deployment
-
Create a production tag (optional, for version tracking):
git checkout main
git pull origin main
git tag -a 1.0.1 -m "Release version 1.0.1"
git push origin 1.0.1
-
Publish to npm (after successful production deployment):
- After production deployment, related packages (such as
@devgateway/dvz-ui-reactand@devgateway/wp-react-lib) are published to npm - This is typically handled by the
data-viz-uirepository's release workflow - Packages are published automatically when changes are merged to
mainin thedata-viz-uirepository - Published packages are available on npmjs.com under the
@devgatewayscope
- After production deployment, related packages (such as
Production Branch Workflow
- All production deployments come from the
mainbranch - Feature branches are merged to
mainvia Pull Requests - The
mainbranch usesprod.Dockerfilefor production builds - Tags on
maincan be used for version tracking (e.g.,1.0.1,1.0.2) - After production deployment, packages are published to npm for consumption by other projects
Dockerfile Selection
The deployment process automatically selects the appropriate Dockerfile based on the branch:
- Feature branches: Uses
test.Dockerfile(located infront/test.Dockerfile) for testing deployments - Production (
main): Usesprod.Dockerfile(located infront/prod.Dockerfile) for production builds - Default: Uses
Dockerfile(located infront/Dockerfile)
Jenkins CI/CD Pipeline
The Jenkins pipeline (Jenkinsfile) handles the build and deployment process:
- Build WordPress Customizer: Builds WordPress custom blocks
- Build All Services: Builds all services including the
uiservice (frontend) - Deploy: Uses Ansible to deploy to the target environment
Environment Variables
The pipeline sets the following environment variables:
REPO: Docker registry repository (e.g.,registry.developmentgateway.org/dvz_example)TAG: Derived from branch name, sanitized for Docker tagsPROJECT_TITLE: Project title used for namingIMAGE_REPO: Docker registry repository (e.g.,registry.developmentgateway.org/data-viz)IMAGE_TAG: Docker image tag (e.g.,latest)
Branch-to-Tag Mapping
The branch name is automatically converted to a Docker tag:
feature/new-ui→feature_new_uifeature/user-dashboard→feature_user_dashboardmain→main
Docker Compose Configuration
The frontend service is configured in docker-compose.yml:
  ui:
    image: ${REPO}/ui:${TAG}
    build:
      context: ./front
      dockerfile: Dockerfile
      args:
        REPO: ${REPO}
        TAG: ${TAG}
        VITE_REACT_APP_DEFAULT_LOCALE: "en"
        VITE_REACT_APP_USE_HASH_LINKS: "false"
        VITE_REACT_APP_LOAD_DEFAULT_THEME: "false"
        VITE_REACT_APP_WP_API: "/wp/wp-json"
        VITE_REACT_APP_WP_SEARCH_END_POINT: "/dg/v1/search"
        VITE_REACT_APP_WP_STYLES: "/wp/wp-admin/load-styles.php?c=1&dir=ltr&load%5Bchunk_0%5D=dashicons,admin-bar,buttons,media-views,editor-buttons,wp-components,wp-block-editor,wp-nux,wp-editor,wp-block-library,wp-block-&load%5Bchunk_1%5D=library-theme,wp-edit-blocks,wp-edit-post,wp-format-library,wp-block-directory,common,forms,admin-menu,dashboard,list-tables,edi&load%5Bchunk_2%5D=t,revisions,media,themes,about,nav-menus,wp-pointer,widgets,site-icon,l10n,wp-auth-check&ver=5.5.6' id='wp-block-library-css"
    environment:
      COREPACK_ENABLE_DOWNLOAD_PROMPT: "0"
    ports:
      - "4173:4173"
    networks:
      - frontend
      - backend
Ansible Deployment
The Ansible playbook (custom/deploy/deploy.yml) handles the deployment:
- Installs required packages
- Configures firewall rules
- Sets up systemd service
- Copies project files including the frontend
- Restarts services
Ensure the playbook includes the frontend files:
- name: Install files
  ansible.builtin.copy:
    src: "../../{{ item }}"
    dest: "{{ systemd_service['Service.WorkingDirectory'] }}/{{ item | dirname }}/"
  loop:
    - docker-compose.yml
    - custom/deploy/nginx.conf
    - docs/Dockerfile
    - front
    - front/Dockerfile
    - custom/wp-customizer
    - custom/wp-customizer/blocks
    - custom/wp-customizer/blocks/build
  notify:
    - Restart stack
Nginx Configuration
The frontend is served through Nginx reverse proxy. Ensure custom/deploy/nginx.conf includes:
location / {
  proxy_set_header Accept-Encoding '';
  proxy_set_header Origin '';
  proxy_ignore_headers Vary;
  proxy_buffer_size 256k;
  proxy_buffers 4 512k;
  client_max_body_size 30M;
  proxy_set_header X-Forwarded-Server $host;
  proxy_set_header Upgrade $http_upgrade;
  proxy_set_header Connection 'upgrade';
  proxy_set_header Host $host;
  proxy_cache_bypass $http_upgrade;
  proxy_pass http://ui:4173/;
}
Troubleshooting
Build Failures
- Check Jenkins build logs for specific error messages
- Verify Dockerfile syntax and dependencies
- Ensure all required environment variables are set
Deployment Issues
- Verify Ansible playbook execution logs
- Check Docker container logs:
docker logs <container-name> - Verify network connectivity between services
Tag Issues
- Ensure tag names follow the convention:
<version>-rc<number>for RC tags - Verify tags are pushed to the remote repository
- Check that the branch name doesn't contain invalid characters for Docker tags
NPM Publishing and Dependency Updates
After successful production deployment, packages are published to npm where project dependencies can be updated. This enables other projects to consume the latest versions of published packages.
Published Packages
The following packages are published to npm after production releases:
- @devgateway/dvz-ui-react: React component library for data visualization
- @devgateway/wp-react-lib: WordPress React library utilities
Publishing Workflow
- Production Deployment: Code is deployed to production from the
mainbranch - Package Publishing: Related packages are automatically published to npm (handled by the
data-viz-uirepository's release workflow) - Version Availability: New versions become available on npm for other projects to consume
Updating Project Dependencies
To update your project's dependencies from npm after a new release:
- Check available versions:
npm view @devgateway/dvz-ui-react versions
npm view @devgateway/wp-react-lib versions
-
Update package.json:
- For the front project, update the dependencies in
front/package.json - Change from
workspace:*to a specific version or use version ranges
- For the front project, update the dependencies in
{
  "dependencies": {
    "@devgateway/dvz-ui-react": "^1.0.1",
    "@devgateway/wp-react-lib": "^1.0.1"
  }
}
- Install updated dependencies:
cd front
npm install
# or if using pnpm:
pnpm install
- Test the updated dependencies:
npm run dev
# Run your test suite
npm test
- Commit the changes:
git add package.json package-lock.json  # or pnpm-lock.yaml
git commit -m "chore: update dependencies to latest npm versions"
git push
Development vs Production Dependencies
During development, the front project uses workspace dependencies (workspace:*) to link to local packages:
{
  "dependencies": {
    "@devgateway/dvz-ui-react": "workspace:*",
    "@devgateway/wp-react-lib": "workspace:*"
  }
}
For production deployments, you can either:
- Continue using workspace dependencies (if building from source)
- Switch to npm versions (if consuming published packages)
The Dockerfiles (Dockerfile, prod.Dockerfile, test.Dockerfile) handle workspace dependencies automatically during the build process.
Version Management
- Semantic Versioning: Packages follow Semantic Versioning (major.minor.patch)
- Version Ranges: Use version ranges in
package.jsonto allow automatic updates:^1.0.1- Allows updates to any 1.x.x version (recommended)~1.0.1- Allows updates to any 1.0.x version1.0.1- Exact version (pinned)
Monitoring Published Versions
- Check npm package pages for release notes and changelogs
- Monitor the
data-viz-uirepository for release announcements - Review package changelogs before updating to understand breaking changes
Best Practices
- Create RC tags on feature branches for testing before merging to
main - Use descriptive feature branch names that indicate the purpose (e.g.,
feature/user-dashboard,feature/new-chart-component) - Increment RC numbers for subsequent testing iterations (e.g.,
1.0.1-rc1,1.0.1-rc2) - Review code thoroughly before merging feature branches to
main - Monitor deployments and verify functionality after each deployment
- Keep
mainbranch stable - only merge tested and reviewed code - Update dependencies regularly to benefit from bug fixes and new features
- Test dependency updates in a separate feature branch before merging to
main - Review changelogs before updating major versions to understand breaking changes