FM Guide
OC Portal Feature Manager
Abstract
The OC Feature Manager (OC FM) is a tool that is meant to fast track configuration of new instances of OCPortal. Unlike the AMP Feature Manager, the OC FM is not meant to be configured by the end user. Its purpose is to make creation of new instances of OCPortal easier by configuring the list of fields that are visible or to tweak the fields that are mandatory in forms.
As such, the effort with developing the OC FM has been focused toward flexibility of configuration and ease of configuration readability rather than UI.
General Functionality
The OC FM main building block is the Feature. A feature is a visible component of the UI that is displayed on a page or service.
Features are configured in YAML configuration files. One configuration file can contain any number of distinct features. A feature is identified by its name.
We exemplify below 3 features, to show how they can be linked together with interdependencies. The first feature is the general concept of a location select. It identifies any component in a form that helps user select locations:
- name: locationSelect
  enabled: yes
  visible: yes
  mandatory: no
Notice the feature has a name, in this case ‘locationSelect’ , and below it has some properties.
-
enabled: the enabled property specifies if the feature is enabled. A feature that is not enabled is treated as a disabled field. This has consequences in forms, for example, where a disabled field is grayed out and cannot be used to type in information - but it is still visible. The same enabled property can have a different meaning if the feature is a chart. A disabled chart will not let the user interact with chart components, like select different elements or click within the chart.
-
visible: the visible properties specifies if a feature is visible or not.
-
mandatory: the mandatory property will define if the feature is mandatory, if part of a data entry form. This means the form cannot be submitted with this feature field empty. This property is not applicable to fields that are not part of forms, and it does nothing if it is used for non form features.
Please check below, as we continue to define more features , and reuse the locationSelect feature that was already defined below:
- name: projectForm.subcounties
  mixins:
  - locationSelect
  mandatory: yes
  mandatoryDeps:
  - projectForm.wards
  enabled: yes
  visible: yes

- name: projectForm.wards
  mixins:
  - locationSelect
  mandatory: yes
  enabled: yes
  visible: yes
  enabledDeps:
    - projectForm.subcounties
  visibleDeps:
    - projectForm.subcounties
We have defined two new features above. The first one is the selector of sub counties in the project form, called “projectForm.subcounties”.
This selector has the locationSelect feature as a mixin. You can view a mixin as an inherited behavior. By defining locationSelect as the mixin of projectForm.subcounties we are telling the system that projectForm.subcounties is a type of a location select.
This means that the mixin properties will be inherited. If we put to disabled the locationSelect mixin, this will automatically make the projectForm.subcounties feature disabled. It does not matter if the projectForm.subcounties enabled property is set to yes, the mixin’s enable property will override it.
This is also true for visibility. If we turn off visibility for the locationSelect, this will turn the projectForm.subcounties invisible regardless of its visibility status.
In case of the mandatory property, the mixin will override the feature only if the mandatory is set to yes in the mixin. This means that if the locationSelect is set to mandatory, then the projectForm.subcounties will be mandatory regardless of its mandatory status.
Looking further at the projectForm.subcounties, we can see that it also has mandatoryDeps pointing towards projectForm.wards. This is because, if the wards are mandatory, it is impossible to have the words function properly without also having the sub counties mandatory.
Looking at the projectForm.wards feature, we can see that it has visibleDeps and enabledDeps both pointing towards projectForm.subcounties. This means that if the projectForm.subcounties becomes disabled or invisible, the wards will also become disabled or invisible. It makes sense, because you will not be able to use the wards selector if the sub counties selector is invisible. In certain cases, it might still be an option to keep enabled the wards selector even when the subcunties selector is disabled, but in our case that does not make much sense, so we are disabling wards too.
By linking the features in this manner, we ensure that the app will be aware of the interdependencies between the features, and will continue to function correctly when we change some feature properties, without worrying about what features may use that feature.
Startup parameters (for developers)
While developing apps using OC FM, a number of configuration parameters can be set. These can be set when the server starts up:
` - fm.emitProjected=true/false (defaults to false)`
This startup property can be injected as spring program argument property (--fm.emitProjected=true)
or java VM option (-Dfm.emitProjected=true). When enabled, this property will dump the projected contents of the FM list of features into an external file,
called _projectedFm.yml, into the home directory of the running application. This file will contain the processed properties for each feature,
after taking into account all the mixins and dependencies. Thus, you will be able to see if a feature is considered enabled/visible/mandatory by the system or not, based on processing all its dependencies.
` -fm.active = true/false (defaults to true)`
This startup property can be injected as spring program argument property (--fm.active=true) or java VM option (-Dfm.active=true).
When active is false, the OC FM engine will be disabled, this means the app will behave as the OC FM does not exist.
All features will be enabled, mandatory will be set to false and visible to true.
-fm.printFeaturesInUseOnExit = true/false (defaults to false)
This will print the list of features that have been accessed at least once during the lifetime of the server. If you access a web page while the server is running, the OC FM will mark all features visible on that page as “in use”. When the server is stopped, the list of features is printed in the system out/log file.
-fm.defaultsFormMissingFeatures = true /false (defaults to false)
If the system finds in some page a feature that is not specified in the YAML configuration file, and if fm.defaultsFormMissingFeatures is set to false,
then the system will throw an exception and the page will stop loading. This will prompt a bug report and will ensure the feature exists
next time in the configuration. If fm.defaultsFormMissingFeatures is set to true, then the system will assume the missing feature has the default values.
The defaults for properties are: enabled=yes, visible=yes, mandatory=no. This is useful in certain situations during development,
when a full list of features on a page needs to be collected, to ease developers create YAML files. It should not be used in production.
-fm.allowReconfiguration = true / false (defaults to false)
if fm.allowReconfiguratoin is true, the system will allow runtime reconfiguration of features. In order to achieve this, the system will mount a page,
/ListFeatureFilePage, which can be accessed only by the admin, and only when fm.allowReconfiguration is true. There is no menu link to this page,
so the admin must use the direct link to access it. This is a feature that should never be used on production, and it is meant for testing purposes only.
When accessing this page, the admin will be displayed with a list of all the YAML configuration files found in the system.
The admin can download them by clicking on the download button, edit them in a local editor, and upload the files using the BROWSE button:
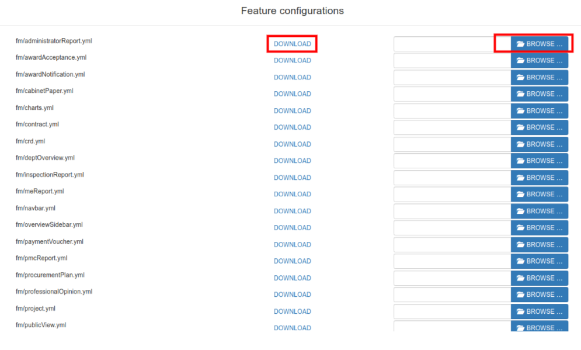
After uploading the file, the FM configuration is reloaded and the admin can instruct the QA team to use this to test the app with a different set of feature properties. This change is available only while the server is running, if the server is restarted, the FM will read the files from the disk and any uploaded changes will be lost. Therefore again, this feature is intended only for testing purposes. If a need arise for example for a feature to be turned to visible, or other properties to be changed, this has to be done manually in the source code YAML files and not through this file upload page.
Changing FM YAML Configuration using Github
The YAML configuration files are part of the OCPortal’s source code. However since they are simple text files, and quite easily readable, they can be edited through github even by non technical team members.
In order to achieve that, the user must have a github account with github team permissions allowing the user to open pull requests on the OC Portal project. We will show how this can be done using the OCPortal github repository url:
https://github.com/devgateway/ocportal/
You will be displayed with a list of files/directories and the branch:
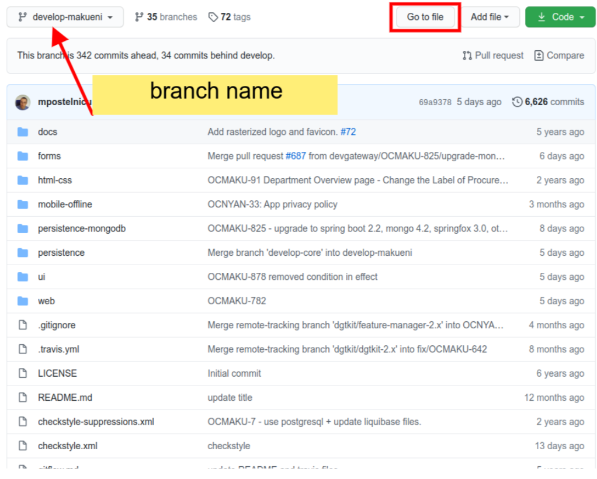
Click on the Go To file button (highlighted in red above) and then you will be able to search by file name the repository. Try to search by .yml (observe the dot in front of yml). You will be presented with a full list of files that have the .yml extension. Almost all of them are related to OC FM.
You may ignore .travis.yml file. The rest are related to OC FM. Let’s say we want to hide a field in tender form. You can click on tender.yml file:
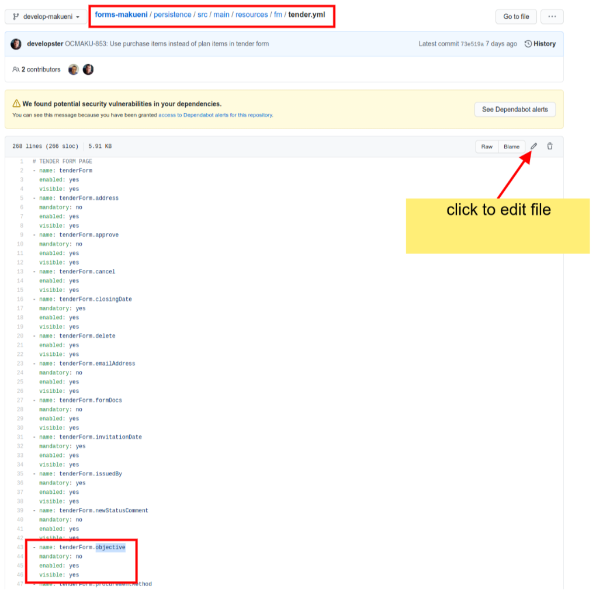
The tender.yml file contents will be presented, and you can see we have a feature in the list with the name
tenderForm.objective. Let’s say we want to hide this. Please click on the pen icon to edit the file (highlighted in red).
On the next page, you will be able to edit the YML file directly in the browser. Go to the tenderForm.objective feature,
and set the visible property to no, like in screenshot below:
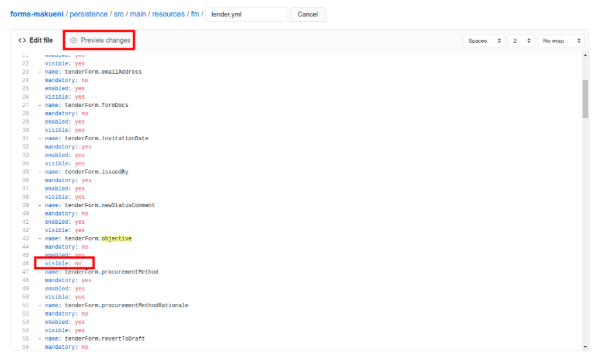
After this you can click on Preview changes (highlighted in the screenshot above) to preview what changes are you planning to commit into the file, you will be presented a page with just the differences:
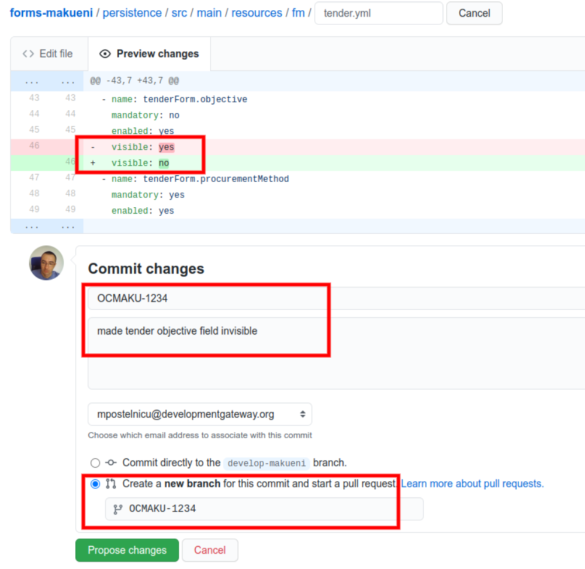
Notice the system has identified the only change you did on the file is to set visible from yes to no for the tenderForm.objective feature. Now all we need is to save the file (or commit, as it is called on github).
When committing such changes it is always advisable to create a new branch with the name of the ticket that we are fixing and also to specify a comment regarding the update.
Also please notice we have added some extra explanatory text to our save/commit, “made tender objective field invisible”. You can add as much text here as you want, to explain the change, however the only required bit is the ticket number, since in many cases the explanation will be found inside the ticket description or comments.
When we are done we can click on the button Propose Changes, to submit our change request. On the next page, github will show you the change/pull request page with the changes we are proposing
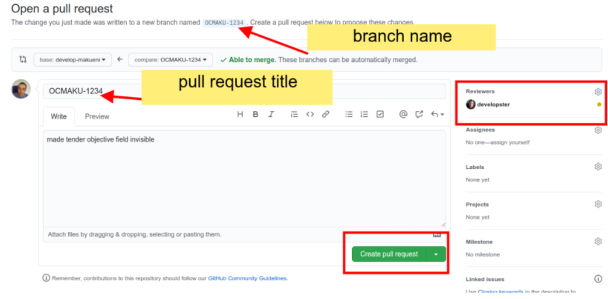
Please note the pull request title was automatically set with the text you added in the previous page. the longer description text was also copied into the pull request description.
Notice the branch name is called as you defined it in the previous page You may also add a developer as reviewer of this pull request, he or she will be notified that this pull/change request was submitted and can accept it or ask for further changes/clarifications.
When you are done, you can click on the Create Pull Request button.
That’s all. The pull request was created and awaits review. A developer will review and can integrate the changes you’ve made.
Explaining feature properties state visually
Because features can be interlinked through various types of dependencies and mixins, it is sometimes difficult to assess why a certain feature is disabled/enabled, invisible/visible, etc… Checking the YAML configuration file helps but it does not tell the full story, as the feature may depend on another feature in a different YAML configuration file, which may depend on another feature. Thus, the user may not understand immediately why say a feature is not visible.
In order to assist explaining this, we have developed a special page called Features, available to the Admins in the Admin menu: Admin->Features.
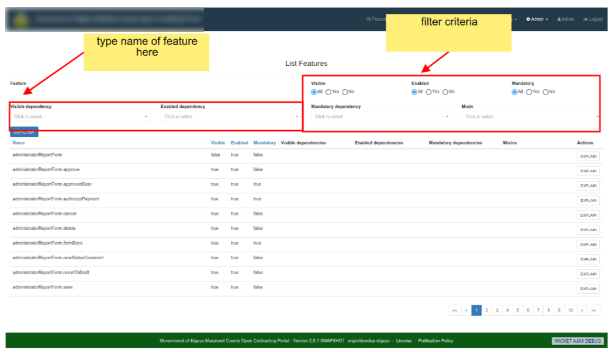
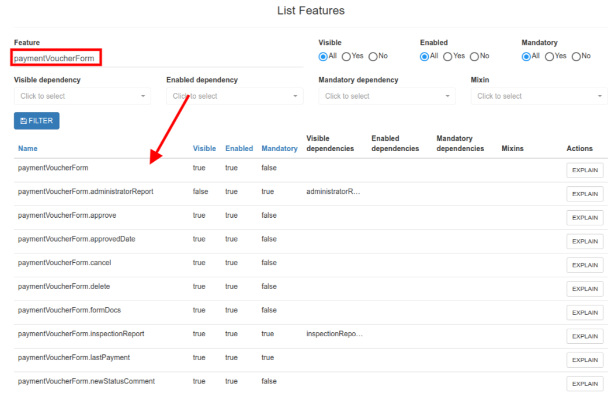
For example we can search for the feature inspection report under paymentVoucher. This feature is called paymentVoucherForm.inspectionReport. We can try to filter the list by this feature name:

The system found one feature by this name and it displays its properties on the same line, visible, enable, mandatory, as well as mixins and dependencies. Notice there is an EXPLAIN button. If we click on it, we will get a popup that will explain why the feature is visible, enabled, and non mandatory:
